It’s been a while. I had my summer holidays and after such a long period of doing almost no coding it was kind of hard to get going again. This chapter felt some how extra hard but at the end when all was working I wondered why it was so hard.
One thing I must mention also. The code base is getting a bit messy. I haven’t put so much attention to the naming and stuff like that. And I have used different kinds of ways of doing the same kind of thing. One reason was that I wanted to also learn my self and also to show to you the different techniques. For example sometimes I use bare functions to do thing and the other time I put the functionality in a method inside a struct. So maybe I write the next chapter about that subject – reorganising the code. Or then I just reorganise the stuff and you will see the result in the code 🙂
Building a World
It sounds overwhelming – to build a world. But following the path a while in this context it isn’t that bad. The steps in the book are clear and small enough.
First our world needs only a way to hold the objects (things) in it and the source of light. I decided to create a struct to represent that. The first test is just test for empty world and the second is for the default world.
Second thing is to find the intersections inside the world. In our default world there is two spheres at the origin. The ray we cast is directed through the origin so there should total of four intersections.
The function that finds those intersections is called intersectRGWordl(). It takes its arguments a world and a ray. What it makes it just loops trough the spheres in given world and uses the previously created intersectRGSphere() function to find intersections and adds all intersections in one array.
That little sortIntersection() function is made just for arrays that contains RGIntersection objects. To be honest this is not the best way to do it. We could have used a clojure here instead and it would have been much cleaner but this is just a way to show an alternative ways to do things.
Figuring out the shading
The nearest hit of a ray is what we are interested off. So to calculate the shading we create first a function that prepares a data structure that can be used to do the the shading calculations easier later on. The function is called prepareRGComputation() and it returns RGComputation struct that holds all those handy variables.
If you look at my code and the pseudo code Jamis have put into his book there is a one obvious difference. He uses variable name object and I have “hardcoded” my objects in to RGSphere. So at this point I started to think hmm… maby my code should be more generic in terms of what kinds of object my tracer is capable to draw. I won’t make any fix in this chapter but this is obviously a thing to keep in mind. I’m not sure if the code in the book is intentionally written like this to give the readers a hint but I’m considering it as one.
The inside property in RGComputation tells if the intersection hit occurs inside the object. Its value is calculated using the dot product of the eye vector and the surface normal. If it’s negative the normal points away from the eye.
Now we can move on to calculate the shading aka the colour in the point of intersection. Because we have during the six chapters slowly build all these components (functions and structures) we can now use those and take advance of them. The function to calculate the shading is like this:
Now, for convenience’s sake, tie up the intersect(), prepare_computations(), andshade_hit() functions with a bow and call the resulting function color_at(world, ray).
Jamis Buck
So according to Jamis quote we are going to put all the things together and create a function called RGColorAt(). It takes the world and ray as its parameter and calculates the color for that ray in given world. I think this is really cool like a milestone. To have a function that takes a world full of things (only spheres at the moment but still), cast a ray in it and it will give color as a result. So here is the title function that does this all.
For this chapter I decided not to put all the test cases here. Those are easier to check out from the source code. Well that’s for the world at the moment. Next we are interested about how to view the world.
Defining a View Transformation
Until this point our point of view have been the same, literally. Our eye is stuck meaning we are stuck 🙂 But that is going to change. Like everything else is math and matrices here we need view transformation matrix to put our eye on a different location in our world and calculate the values for our picture from that point of view.
View transformation …orients the world relative to your eye, thus allowing you to line everything up and get exactly the shot that you need.
Jamis Buck
What actually happens is that the transformation moves the world (by moving all the worlds coordinates from world coordinate space to the views coordinate space) but the effect is same as moving the eye.
The function in our case is called newRGViewTransformation(). It takes three parameters. First is the from: which is the position of our eye in world (in worlds coordinate space). So we just move our viewing location in different place.
Second parameter is to: which is the point in our world where we are looking at. It is kind of the point of interest. Inside the function that calculates the view transformation function there is relation between the from and to.
Third parameter is up: .
Studying the test cases you will see that the view transformation moves the world coordinate space into the views coordinate space. The paraemeters to our newRGViewTransformation function are given in world space and the result is matrix that transforms points into to view space. Why I am repeating this? I think its important to understand 🙂
Camera
This is a component for our ray tracer that makes it easier to manage our viewing frame. We can put our camera where we want inside our world and take picture with it. How cool is that 🙂
So the camera takes as its input parameter the width and height of the frame (size of the canvas), the field of view (the smaller the more zoom and bigger the less zoom) and the transform matrix created above.
The canvas we have used so far will now be put one unit in front of the camera and all the pixels are calculated on that canvas. First thing is to make the camera aware of the size of the pixel (in world-space). If I am on the right track this is the resolution of our camera. Smaller pixel size means more detailed image.
Here I choose to use Swift feature to create properties that has public getter and private setter. I thinks this makes sense since halfWidth, halfHeight and pixelSize are properties that are calculated based on the other three properties. Another Swift feature is that didSet feature for a property which is a way to trigger something when ever a property is set. In our case it means that when one of the three properties change the pixelSize is recalculated.
Rays passing through the pixels on canvas
Those three properties halfWidth, halfHeight and pixelSize are used to calculate rays that can pass through every pixel on the canvas. Yet a new function is needed. I call it newRGRayForPixel(). It takes the camera and the pixel as its input and return a RGRay.
Now the last thing to do is to tie together the camera and world and create actually some image. So we create the renderRGWorldWithCamera function that takes the camera and world an returns a filled RGCanvas as a result. Like the book says the code in this function looks familiar and it is. We are only using our new function to do the calculations inside the loop.
Putting It Together
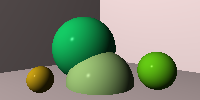
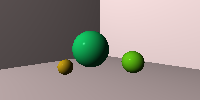
In the source code there is Chapter 7 playground where putting it together is implemented. I’am not going to go it trough step by step. The code is commented so you can follow the steps there.
One thing to mention is that my first render image was like this:

There is something wrong compared to the one in the book. Then I realised I had to remove all the default things from the world and after that put the things mentioned in the book into my world. After that modification the image was as expected. Well the field of view is different in this image but the content is right.

In the next chapter there will be shadows so I guess that means more calculations 🙂
